Thursday, December 10, 2009

The Hallway Door

Anybody who has been in our house knows that we have a random door in the upstairs hallway that used to go out to a second floor greenhouse. However, the previous owners didn't like the greenhouse and tore it off, leaving this door there. If you were to open it and walk out, you would fall 2 stories to the concrete driveway below....
And while we would love to rebuild that second floor addition at some point, since it was not in our near financial future, we needed to do something about the door before one of our curious kids figured out how to open it!


Step one was tearing out all of the hallway plaster (which we had to do anyway to rewire the second floor!). Step two was to insulte the exterior wall (since no walls in our house were insulated, and last winter's $800/month heating bills killed us!! Step 3 was to lock all of the children downstairs so they didn't come up while we were working...

Step 4 was to remove the door and trim pieces, and build in the framing for the new window...


The framing was built, and then the exterior had to be covered with pressure treated plywood. We still need to bend metal to cover up the board so it matches the house.


And finally, we have a new window! Special order to match the style of the rest of the upstairs windows, it is a huge improvement (and MUCH safer!) over the door!
Posted by Picasa

Monday, June 29, 2009

The Kitchen

When last we left our heroes (MANY months ago), the kitchen cabinets around the fridge had to come down to accommodate bringing in the new fridge from the garage. From there, there was no turning back....

First, the bulkheads needed to be torn out. These things were HUGE (big enough that an adult could easily crawl through them- about 3 feet x 3 feet), and they took up so much head space, that we wanted them gone! I included the picture below to remind you how big they were, and the picture above shows how much open space there was as we started to remove them


Next came getting rid of the kids for the weekend to plastic off the whole kitchen. As with many old houses, the answer to "what lies beneath" usually includes the word asbestos.... (cue the ominous music). We bought haz-mat suits, masks, and hoods, in addition to a large air purifier, and started tearing out the parts of the kitchen suspected to contain asbestos...


Jeff doing demo in his suit and mask...


All done with bulkhead demo, and ready to bring in the big guns. Note though, that about 4 months passed between this picture and the one before it. In that time, this was as much of a kitchen as I had to use (including for Christmas....)
Bye bye old kitchen!! We saved the cabinets and they will be installed in the basement for storage, but that awful window and laminate countertops HAD to go!

So Brad came over for the day and Jeff took the day off, to completely demo the kitchen:

4 hours later, this is what it looked like!


Running the wiring for all of the separate kitchen circuits (7 I think!)
A little explanation on this one- this is probably the thing in the kitchen I am MOST proud of! The new plumbing had to run slightly below the joists in one area in order to have the proper grading. A small bulkhead had to be built to contain it. Now I had never done framing carpentry before, and frankly that full size nail gun is a bit intimidating, but with the encouragement of a friend (thanks Kev!), I decided to attempt building it myself. I can't tell you how excited I was when it fit on the first try!!


Drywall in the kitchen. Brad did the walls, Kevin did the ceiling (and Jeff ate Doritos- see previous post)


Starting to sand down the hardwood- the same floors that run through the rest of the house. You can also see the wonderful ceiling fan and pendant light that Jeff installed!

Starting to paint in preparation for cabinets. We picked a color that we liked, and then Jeff found it on the Oops Paint shelf @ Home Depot. YAY for $5 Oops paints!!


Dry-fitting the first cabinets. By the way, for those keeping track of our budget, we got our entire kitchen's worth of cabinets for under $2200!! They were 75% off clearance price at Lowes when they switched to a new stock cabinet brand. Between what they had in stock, and the display that we also bought (when they took it down), we were able to get cabinets for the whole kitchen!

The scary looking pipes under the sink- I would be replacing these later. We now have a brand new PVC drain (very proud of that work), and new copper supply lines (which Jeff soldered without any leaks on the first try!).


(Cue the choir of angels): CABINETS!

The built in cabinets by the fridge (and the small bulkhead that I built above it)

A close up view of our granite tile countertops. Did you know we got this for less than $1.50/ square foot? Also clearance at Lowes...


Starting the granite tile backsplash. We splurged on this one (but still got it on sale, since we got a 25% discount by using Brad's name), and the cost per square foot was $8.99. We chose the color to tie in the black appliances, and it has silver specks in it to tie in the stainless steel, and tan flecks to tie in the cabinets:

Tiles set, spacers in, waiting for the thinset to dry

Taking the spacers out and starting to clean up:

Cleaned up and ready for grout. We wanted it to look as continuous as possible, so we went with a black grout (I'll post pics of the tiles grouted later)

Our Kohler cast iron sink, getting ready to go in. Note that we will finally have a garbage disposal! My husband is so good at this stuff! :-)


Wiring in and installing the garbage disposal. I ran the drains after that was done


A close-up of our cabinet hardware. They were a price error on Lowe's website- 99 cents apiece.

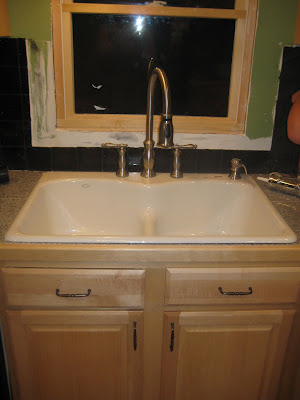
A sink!!! The window behind it still needs to be trimmed out, but we have a working sink again!

Master Bathroom

When last I posted, the tile had been laid, but not grouted. So, here is a picture of the grouting, in process. We used black grout (since it will never look dirty! :-). and it was quite to mess to put on! Here I was waiting the 15 minutes for it to glaze over before I sponged it off of the tiles...


Next, it was time to install the toilet. In keeping with the house, NOTHING is easy. For those of who have installed a toilet, it is probably one of the simplest household installs ever! You set the new ring, set the toilet, sit on it to compress the ring, tighten carriage bolts and attach supply line. Unfortunately, that only works with the forgone conclusion that the floor is LEVEL. Yeah... go figure- old house.... floor not so level. I did my best to level it out with tile, but there were still some issues. After setting the toilet once and realized you would be rocking on it while sitting, we had to make the trip to the store to get toilet shims. Thankfully, they make wonderful little rubber shims just for cases such as this :-). Toilet problem solved!


Next, it was time to use painters tape on the walls to mark off where the stripes would be. Another issue with leveling... I found out that from the high corner of the room to the low corner, the floor drops more than an inch and a half. I decided to make the stripes level for sight purposes, but unfortunately that meant it took a LOT longer to mark off the stripes... (and a plug for a GREAT product I discovered- that green tape. It's called Frog Tape, and unlike regular painters tape, there is ZERO paint seepage under it. You get a crisp line every time- awesome!)


Next it was time for the finishing touches. Towel bars, wall art, etc...


And I thought this perspective shot was cool. It gives a good look at the room :-). I will post a few more pics later showing the window (once I finish the trim) and the door (also still needs to be trimmed out). But other than that, the bathroom is now FULLY FUNCTIONAL. YAY!!!!

Tuesday, May 5, 2009

Bathroom Updates

In going back through the blog, I realized that I have been terribly remiss in posting bathroom updates (probably because I've actually been WORKING on the room, and not sitting at the computer!). I try to generally not work on the room until after the kids are in bed, so I'm usually ready to crash by the time I wrap up in there for the night! Jeff refers to the room as being my pet project, so I have taken a lot of pride in watching this room take shape. :-)


This is after much of the demo has been done. If you remember from earlier pics, there was a center wall which divided up about half of the room. I had to take that down, as well as strip all of the walls of their plaster, in order to allow appropriate access to run all of the electrical lines. LOTS of trash cans full of plaster and lathe!


Next, I had to square up the areas of the subfloor which were damaged or missing, and replace it with new subfloor. That saw has probably become the most useful tool we own in terms of my work in the bathroom...!
Then, I had to pry up all of the old hardwood floor. This pic shows the subfloor all clean after I had taken out all of the hardwood. I did save as much of it as I could, have pounded the nails out of it, and will be saving it in the attic. That way, if we ever have to replace a section of the hardwood somewhere in the house, we have the original flooring which the house was built with, that we can use to patch :).


A pic of Kev hanging a slighly lower ceiling to allow for ductwork and a level ceiling... Also, note all of the electrical work. I had Jeff do that part- I do NOT do electrical!


And then, there was drywall (and plumbing!) A sidenote on the plumbing- we ended up having to replace all of the drainlines and water lines in the house (to the tune of $2200!). It was a patchwork of PVC, C-PVC, cast iron, galvanized, and copper piping- essentially a bunch of leaks just waiting to happen (not to mention the vent line through the roof was totally clogged!). Now, everything is PEX (except for copper fixture attachments), and PVC drain lines. This should last us (problem free) for many years to come!


More drywall, and in this pic you can see the cement backerboard that I lay down over the subfloor. This had to be nailed down to provide a flat and even surface for the tile.


More drywall, and a view of the shower stall and the new fan (see post below concerning my adventure getting that thing installed!)


Mudded drywall and starting to prime....

And then, there was COLOR! This is a little more brown and a little less yellow than it looks in the pic. The color was actually inspired by the veins of this color that run through the black and white marble tiles which I picked out for the flooring. Also, there are 2 of these sconce lights in the room which will be on either side of the large mirror which I purchased (80% off!). The lights were on clearance also- only $5.19 for a set of 2!!


More color, and getting ready to tile...


TILE!!! I can honestly say that laying tile was a whole lot harder than I thought it was going to be. I'm sure part of it was the fact that I was laying it in an old house- where nothing is square and the old subfloor and floor joists aren't level.... but it took me forever with the thinset and rubber mallet to try and get these things even CLOSE to being level!

And this is what it looks like tonight, just waiting for the thinset to set so that I can grout (black) tomorrow morning. Once I do that, we will be able to set the fixtures after work tomorrow night :-). The pedistal sink and toilet are all ready to go in as soon as the grouting is done... and then we can start using the bathroom!

Projects still to be done:
1- Grout the tile
2- Install 10 inch baseboard to mimic the rest of the house
3- Have Brad install out special ordered new window (it has the same vertical latice on it that the rest of the house windows so, so that it will match)
4- Set fixtures and hang mirror
5- Put up shower curtain and install window vailance.
6- Attach door to door frame (and swap hinges so it opens into the bedroom instead of into the bathroom)
7- Build free standing linen cupboard
8- Enjoy not having to share a bathroom with my kids!!!!!!!

A Tribute to the Pros....

Lest anyone think that Jeff and I are single handedly doing all of the work on the house, I wanted to dedicate a post to the people who REALLY know what they're doing, and who have come to help us out with the stuff that is well beyond our skill level....

Our neighbor, Brad Engelberg, hanging drywall in the kitchen. I can't even CARRY one of those 8 foot sheets by myself, so it's a little intimidating to see him able to hold it with one hand, and attach it with the other!


Kevin Carlson did the framing in the attic, and hung the kicthen ceiling, as well as ALL of the drywall in the new bathroom. What I have learned from watching Kev is that having the right tools for the job is absolutely essential! Took him about 3 hours what it would have taken us DAYS to do!


Jeremy Tell ran the HVAC vent to the new bathroom for us. (he's vacuuming out the ductwork in this pic before coming off of it to place the new one). It made the room feel real though, to have heat running to it :-)


And this is Jeff, enjoying his Doritos while observing the pros at work. People ask me for home improvement advice, and probably the most valuable thing we have learned in this process is that it is VERY important to recognize when something is beyond your skill level, that it is worth hiring it out!
Posted by Picasa