 First, the bulkheads needed to be torn out. These things were HUGE (big enough that an adult could easily crawl through them- about 3 feet x 3 feet), and they took up so much head space, that we wanted them gone! I included the picture below to remind you how big they were, and the picture above shows how much open space there was as we started to remove them
Next came getting rid of the kids for the weekend to plastic off the whole kitchen. As with many old houses, the answer to "what lies beneath" usually includes the word asbestos.... (cue the ominous music). We bought haz-mat suits, masks, and hoods, in addition to a large air purifier, and started tearing out the parts of the kitchen suspected to contain asbestos...

Jeff doing demo in his suit and mask...

All done with bulkhead demo, and ready to bring in the big guns. Note though, that about 4 months passed between this picture and the one before it. In that time, this was as much of a kitchen as I had to use (including for Christmas....)
 Bye bye old kitchen!! We saved the cabinets and they will be installed in the basement for storage, but that awful window and laminate countertops HAD to go!
So Brad came over for the day and Jeff took the day off, to completely demo the kitchen:

4 hours later, this is what it looked like!

Running the wiring for all of the separate kitchen circuits (7 I think!)

A little explanation on this one- this is probably the thing in the kitchen I am MOST proud of! The new plumbing had to run slightly below the joists in one area in order to have the proper grading. A small bulkhead had to be built to contain it. Now I had never done framing carpentry before, and frankly that full size nail gun is a bit intimidating, but with the encouragement of a friend (thanks Kev!), I decided to attempt building it myself. I can't tell you how excited I was when it fit on the first try!!

Drywall in the kitchen. Brad did the walls, Kevin did the ceiling (and Jeff ate Doritos- see previous post)

Starting to sand down the hardwood- the same floors that run through the rest of the house. You can also see the wonderful ceiling fan and pendant light that Jeff installed!

Starting to paint in preparation for cabinets. We picked a color that we liked, and then Jeff found it on the Oops Paint shelf @ Home Depot. YAY for $5 Oops paints!!

Dry-fitting the first cabinets. By the way, for those keeping track of our budget, we got our entire kitchen's worth of cabinets for under $2200!! They were 75% off clearance price at Lowes when they switched to a new stock cabinet brand. Between what they had in stock, and the display that we also bought (when they took it down), we were able to get cabinets for the whole kitchen!

The scary looking pipes under the sink- I would be replacing these later. We now have a brand new PVC drain (very proud of that work), and new copper supply lines (which Jeff soldered without any leaks on the first try!).

(Cue the choir of angels): CABINETS!

The built in cabinets by the fridge (and the small bulkhead that I built above it)

A close up view of our granite tile countertops. Did you know we got this for less than $1.50/ square foot? Also clearance at Lowes...

Starting the granite tile backsplash. We splurged on this one (but still got it on sale, since we got a 25% discount by using Brad's name), and the cost per square foot was $8.99. We chose the color to tie in the black appliances, and it has silver specks in it to tie in the stainless steel, and tan flecks to tie in the cabinets:

Tiles set, spacers in, waiting for the thinset to dry

Taking the spacers out and starting to clean up:

Cleaned up and ready for grout. We wanted it to look as continuous as possible, so we went with a black grout (I'll post pics of the tiles grouted later)

Our Kohler cast iron sink, getting ready to go in. Note that we will finally have a garbage disposal! My husband is so good at this stuff! :-)

Wiring in and installing the garbage disposal. I ran the drains after that was done

A close-up of our cabinet hardware. They were a price error on Lowe's website- 99 cents apiece.

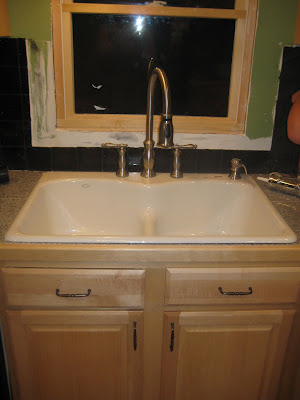
A sink!!! The window behind it still needs to be trimmed out, but we have a working sink again!


7 comments:
The tile backsplash is so beautiful. Everything looks great.
Wow - looks great. I need to see a "completed" picture of the whole kitchen.... please. ;-)
You guys rock! Remodeling seems to be a marriage tester (like canoeing ;) - you seem to be enjoying yourselves.
It looks great! You all did a really good job!
That's so great! What a long tiring project, but the results look so worth it!
Nice!
I'm so glad to finally see the pictures of your kitchen ! IT is beautiful and I can't wait to see it in person! Great job!
Post a Comment